Events
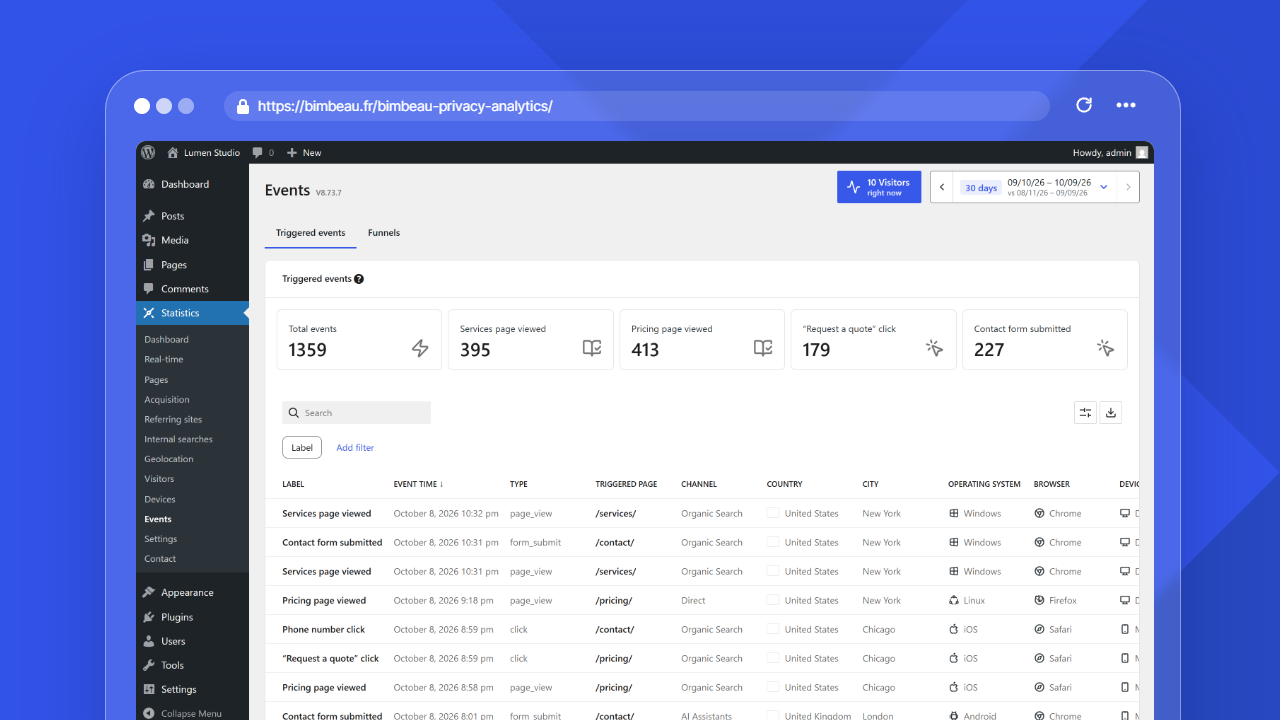
Events are a BimBeau Privacy Analytics Pro feature that help you track specific actions, interactions, or page behaviors that matter to your website.
Use Events when page views and visits are not enough and you want to measure important user actions more precisely.
Good to know
Events are a Pro feature. If the Events settings or report are not visible, check that your Pro license is active and that your WordPress user has access to BimBeau Privacy Analytics Pro features.
What Events are for
Events help you answer questions such as:
- How often do visitors click an important button?
- How often is a specific page viewed?
- Are visitors submitting or interacting with a form?
- Which events should appear as dashboard KPIs?
- Which pages, countries, cities, devices, browsers, or operating systems are associated with triggered events?
- Are event actions running successfully?
Event examples
Common event use cases include:
- tracking clicks on a contact button;
- tracking clicks on a pricing or quote request button;
- tracking views of a thank-you page;
- tracking visits to a campaign landing page;
- tracking form confirmations through the page shown after a successful submission;
- monitoring important calls to action;
- measuring interactions that support conversions.
Good to know
Events are most useful when they are tied to a clear business, content, or UX goal. Avoid creating too many events without a reporting purpose.
Event triggers
An event trigger defines when an event should be recorded.
Use a click trigger when you want to record clicks on a specific button, link, or interface element. Click triggers usually rely on a CSS selector that matches the target element.
Use a page view trigger when you want to record visits to a specific page or URL pattern, such as a thank-you page or campaign landing page.
New events offer these two trigger types. Events created with an older version can also use the Form submission and Webhook trigger types, which are kept and keep working (see Older trigger types).
Click events
Click events are useful for buttons, links, navigation items, tabs, accordions, downloads, or calls to action.
Good click event examples:
- a “Contact us” button;
- a “Request a quote” button;
- a “Download brochure” link;
- a pricing CTA;
- a phone link;
- a newsletter signup button.
Important
Click events depend on the CSS selector you configure. If the selector is too broad, it may record unrelated clicks. If it is too narrow or changes after a redesign, the event may stop triggering.
Older trigger types
The Form submission and Webhook trigger types can no longer be chosen for a new event. Events that already use them keep their trigger type, which stays listed in the Trigger type field of these events only.
To measure a form today, prefer a Page view event on the confirmation or thank-you page shown after a successful submission: a visitor can click a submit button without the form being sent.
Form submission events
Existing form submission events keep recording form submissions. If you also track a click on the same form, one visitor action can create two event occurrences.
Webhook events
A webhook event is recorded by your server or by another service (a form plugin, a CRM, an automation tool) that calls the event's Webhook URL, not by the browser tracker. In the event settings:
- Webhook URL shows the address to call, with Copy URL; Generate token or Regenerate token creates the secret token included in the URL (regenerating it invalidates the previous URL);
- Allowed webhook params is the comma-separated list of payload keys that may be stored with the occurrence; other keys are ignored;
- the action field becomes a Server action template; browser JavaScript is not executed for webhook events.
A request that sends submission_id, webhook_request_id or idempotency_key is recorded only once per value. Requests are rate-limited. Webhook events have no visit: they appear in the triggered events list but cannot be funnel steps.
Important
Treat the webhook URL as a secret, and do not send personal data in the allowed parameters.
Page view events
Page view events are useful for important page visits.
Common examples:
- a thank-you page after a form submission;
- a booking confirmation page;
- a checkout success page;
- a pricing page;
- a campaign landing page;
- a gated content page.
Page view events are often easier to configure than click events because they rely on a target page or URL pattern rather than a CSS selector.
Event actions
Events can also include actions depending on your configuration.
An action defines what should happen when an event is triggered. For example, a tracking snippet action can run custom JavaScript when the event occurs.
Important
Only add event actions if you understand what the action does. Custom snippets can affect website behavior and should be reviewed carefully before being used on a live site.
Only users allowed to publish unfiltered HTML (on a single site, administrators and editors by default; on multisite, super administrators only) can add or change JavaScript snippets. Other users who can manage the Events settings can still edit the other event fields; existing snippets keep running.
Snippets can use placeholders such as {{page_url}}, {{page_title}} or {{element_text}}. Use them as bare values, never inside quotes: write page_location: {{page_url}}, not page_location: '{{page_url}}'. The values are inserted as escaped JavaScript strings, and Check syntax warns when a placeholder is wrapped in quotes.
Creating an event
-
Open Events settings
In your WordPress admin area, go to Statistics → Settings → Events.
-
Add a new event
Choose Add event and give the event a clear label (25 characters at most). Choose its Event ID when you create it: events already recorded keep the ID they were counted under, so renaming the ID of an existing event starts a new history (a message below the field says so).
-
Choose the trigger type
Select whether the event should trigger on a Click or a Page view.
-
Configure the trigger
For a click, add one or more CSS selectors; for a page view, search and choose the Target page.
-
Decide whether it should appear as a KPI
If the event is important enough for high-level monitoring, enable it as a KPI when available.
On mobile layouts, open the event accordion to access the Include in KPI and Enable event toggles inside the event card.
-
Save settings
Save the event configuration.
-
Test the event
Visit the public page where the event should run and trigger the action as a normal visitor would.
Event KPIs
Event KPIs help you highlight important events in reporting views.
Use KPI slots for events that matter most, such as:
- quote requests;
- contact clicks;
- form submissions;
- booking starts;
- pricing page views;
- lead-generation actions.
Good to know
Keep event labels short and easy to understand. KPI labels should be clear enough to read quickly in a dashboard context.
Events report
The Events report helps you review triggered events over a selected period.
When event reporting is enabled and advanced tracking is allowed, the Triggered events table includes these columns. Some values may be unavailable if BimBeau Privacy Analytics cannot collect the related signal for an occurrence.
The Label (event), Channel, Country, and City filters show the number of matching occurrences across the selected period. Each filter reflects the other active filters, while retaining alternative values for its own dimension. Existing results remain visible while filtered data refreshes.
The Triggered events list uses the WordPress list component (DataViews), the one of the Pages and Templates screens:
- the search field is at the top left of the list, and the export button sits at the top right next to the View options button (cog icon);
- the Label filter (the event) is always shown next to the search; Add filter (funnel icon) adds the Channel, Country and City filters;
- each active filter appears as a chip, such as "Country is: France"; a chip opens to change or remove the filter, and Reset clears the filters and the search without changing the reporting period; choosing another country removes the City filter;
- View options holds the density (compact by default; the choice applies to every list and is kept for your account in this browser), Items per page (5, 10, 20, 50 or 100) and Columns, where every column except the event label can be hidden; occurrences stay listed newest first;
- when the results span more than one page, the pagination at the bottom shows the item count, a page selector and the previous and next page arrows.
| Field | What it means |
|---|---|
| Label | The event label or identifier |
| Event time | When the event occurrence was recorded |
| Type | The trigger type, such as click, form submit, or page view |
| Triggered page | The page where the event occurred, or all pages for site-wide triggers |
| Country | Geographic country information associated with the event, when available |
| City | Geographic city information associated with the event, when available |
| Operating system | The detected operating system, when available |
| Browser | The detected browser, when available |
| Device | The detected device category, when available |
| Details | A view action for eligible trigger types, when available |
The report has two tabs: Triggered events, described above, and Funnels.
Funnels
The Funnels tab follows the visits that complete several events in order and shows where visitors drop off, with the conversion rate, the median time to convert, the details by channel and device, and the revenue of a WooCommerce purchase funnel. See Conversion funnels.
WooCommerce purchase funnel
With WooCommerce active, the Funnels tab offers a ready-made purchase funnel (product viewed, added to cart, checkout started, order placed) that needs no event configuration. See WooCommerce purchase funnel.
Exporting events
Events exports are available from the toolbar of the Triggered events list. The export action downloads the captured events list for the selected period and active filters. CSV, JSON, and Excel formats are available when report exports are available for the current Pro license and server environment.
Data handling
Exported event files may contain website activity, event context, and geographic or device information. Store and share exports according to your privacy policy and internal data handling rules.
Testing events
Always test a new event before relying on it for reporting.
Recommended test workflow:
-
Open a private browser window
Test as a normal visitor rather than only as a logged-in WordPress administrator.
-
Grant or decline consent as needed
If your setup requires analytics consent, test both the declined and accepted states.
-
Trigger the event
Click the target element, submit the form, or view the target page.
-
Check Events reporting
Return to BimBeau Privacy Analytics and check whether the event appears in the Events report.
-
Adjust the configuration if needed
If the event does not appear, review the selector, page pattern, tracking settings, and consent behavior.
Privacy and consent behavior
Events usually depend on advanced tracking and your event configuration.
If your website requires consent for advanced analytics, your CMP should control whether the advanced BimBeau Privacy Analytics tracker is allowed to run.
Important
BimBeau Privacy Analytics is not a consent management platform. Make sure your CMP, privacy policy, and event configuration match your legal and operational requirements.
Choosing good event names
Good event names make reports easier to understand.
Use labels that are:
- short;
- specific;
- action-oriented;
- understandable by non-technical users;
- consistent across similar events.
Examples:
| Weak label | Better label |
|---|---|
| Button click | Contact button click |
| Form | Quote form submit |
| Page | Pricing page view |
| CTA | Homepage CTA click |
Avoiding event noise
Too many events can make reports harder to read.
Before creating an event, ask:
- Will this event support a decision?
- Will someone review it regularly?
- Is it tied to a conversion, content goal, or UX question?
- Can an existing report already answer the question?
Good to know
A small set of meaningful events is usually more useful than a large list of low-value interactions.
Troubleshooting events
If events do not appear as expected, check the following:
-
Confirm Pro is active
Events are a Pro feature. Make sure your Pro license or account connection is active.
-
Check that Events are enabled
Confirm that the event is enabled in BimBeau Privacy Analytics settings.
-
Review the trigger configuration
Check the CSS selector, form selector, or page pattern used by the event.
-
Test as a logged-out visitor
Your logged-in WordPress role or exclusions may affect whether your own activity is tracked.
-
Review consent behavior
If advanced tracking is blocked by your CMP, event tracking may not run.
-
Check cache and script optimization
Aggressive script delay, combination, or blocking rules can interfere with tracking scripts or event listeners.
Next step
Continue with PWA Stats App to learn about the dedicated Pro app-like analytics interface.